I haven't done intensive testing, but here you can find the current source code:
HanashiEki_ino.ino
The functionality of this version:
* Sound control via remote IR (connected to I/O 11)
* Assignment of sounds to outputs (like a switch). Is possible to use an existent output number, useful to play a sound at the same time a switch is activated.
* Assignment of sounds to each function (F1-F4) of each Locomotive
* Assignment of sounds to a locomotive when it stops on any of 10 configurable detection sections
* Easy config procedure with the serial monitor (type "config" to show main menu)
Friday, February 28, 2014
Saturday, February 15, 2014
Station Announcer... final version?
Some more advances in the station announcer version, and if this is not the last version, it's pretty near!!


I tried to do a very simple project, able for those who don't know a lot about electronics (like me) or know nothing about programming. It's intended for Loconet digital layouts, but it's also possible to manage it from a standard remote control, so it can work also in analogical systems. I kept the existing functionality:
* Remote control for playing MP3 files, selecting the source (memory stick, SD card, internal memory), setting the volume and save settings.
* Assign MP3 files to output events. Whenever a defined output is activated (from hand throttle, main command station or software) its assigned sound is played
* NEW: Function keys from F1 to F4 for each individual locomotive can be also assigned to a sound, without loosing its functionality. I mean we can assign a horn or break sound to a locomotive's function key that is programmed to turn off the lights or set maneuver speed and the sound will play at the same time the function is executed. Each locomotive for each function key can have a personalized sound in each function key.
* NEW: Assign a sound to a locomotive that will be played when it stops in up to 10 configured segments. Of course this segments must be retro signaled. The main goal is to play an announce when the locomotive stops in front of the station, doesn't matter the track. So basically you configure up to 10 segments informed by loconet retro-modules, assign a sound to a locomotive and when it stops on any of these segments, it's sound is played.
May be you are asking yourself if you need any identification system to know whichlocomotive is the one stopped in the station... the answer is NO, but Arduino will know which locomotive has stopped, and will play it's personalized sound or announcement.
I will explain the tricky part with a very simple introduction of how Loconet communications work:
When you use a complete communication bus like Loconet in your layout, all kind of messages, signals and instructions are sent through the bus to all its components and modules. When an output is activated from your throttle, a message is sent through the bus to all modules saying "Output number X activate". This is received by all devices listening the bus, but of course just the module in charge of output X executes the command. The same happens when a signaling module detects consumption in a segment, it sends a message saying "My section number X has been activated". The software controlling the layout also receives it, and it can react stopping a locomotive or changing a light. And finally, in the bus you also receive all instructions sent to the trains, like changes of speed, activation or deactivation of functions, ...
And basically the software in Arduino "hacks" the network interpreting all kind of messages, in IT language it's a sniffer. When it receives a message informing the activation of one of the configured sections, pays attention to the first locomotive setting it's speed to zero. In this last message the number of locomotive is informed, so it assumes that locomotive is the one that has stopped in this section and therefore plays it's configured announcement or sound.
As it is an independent and passive system, not interfering in the communications, it doesn't need any kind of special configuration in the software, throttles nor locomotives. And it works in any Loconet layout with any software, command station and decoders. Also works in a full automated system or when we drive it manually.
The hardware construction is easy: buy an Arduino Uno, plug on it a MP3 shield from Elechouse and build your own Loconet interface or buy a GCA50 board from Peter Giling to have half of the work already done.
The software part is also easy: upload the program in arduino, and connect it to the USB. To set up the parameters there is a menu shown directly in the serial console of Arduino IDE:
Typing "config" the menu shows the options to set up the sensors (up to 10), Locomotives (up to 50), clear the memory and save settings.
When setting up a locomotive we just need to type the id number (same number we use in the throttle) and the function where we want to assign a sound. It can be any of the function keys (F1 to F4) or SENSOR. SENSOR means the sound that will be played when this loco stops on any of the 10 sections configured in the first option of the main menu.
As always, now I have to clean the source code and optimize some parts before publishing it. That's the boring part once you see it's already working..... XDDD
I hope you liked it and be useful for anybody else!!!! Cheers,
Wednesday, January 15, 2014
Station Announcer final project
Finally I have a stable version of the station announcer running in Arduino and suitable for both analog (through a remote controller) and digital systems (with Loconet bus). I'll try to explain everything in an easy way, but be careful, I won't be responsible for any damage or any mistake in explanations!!!
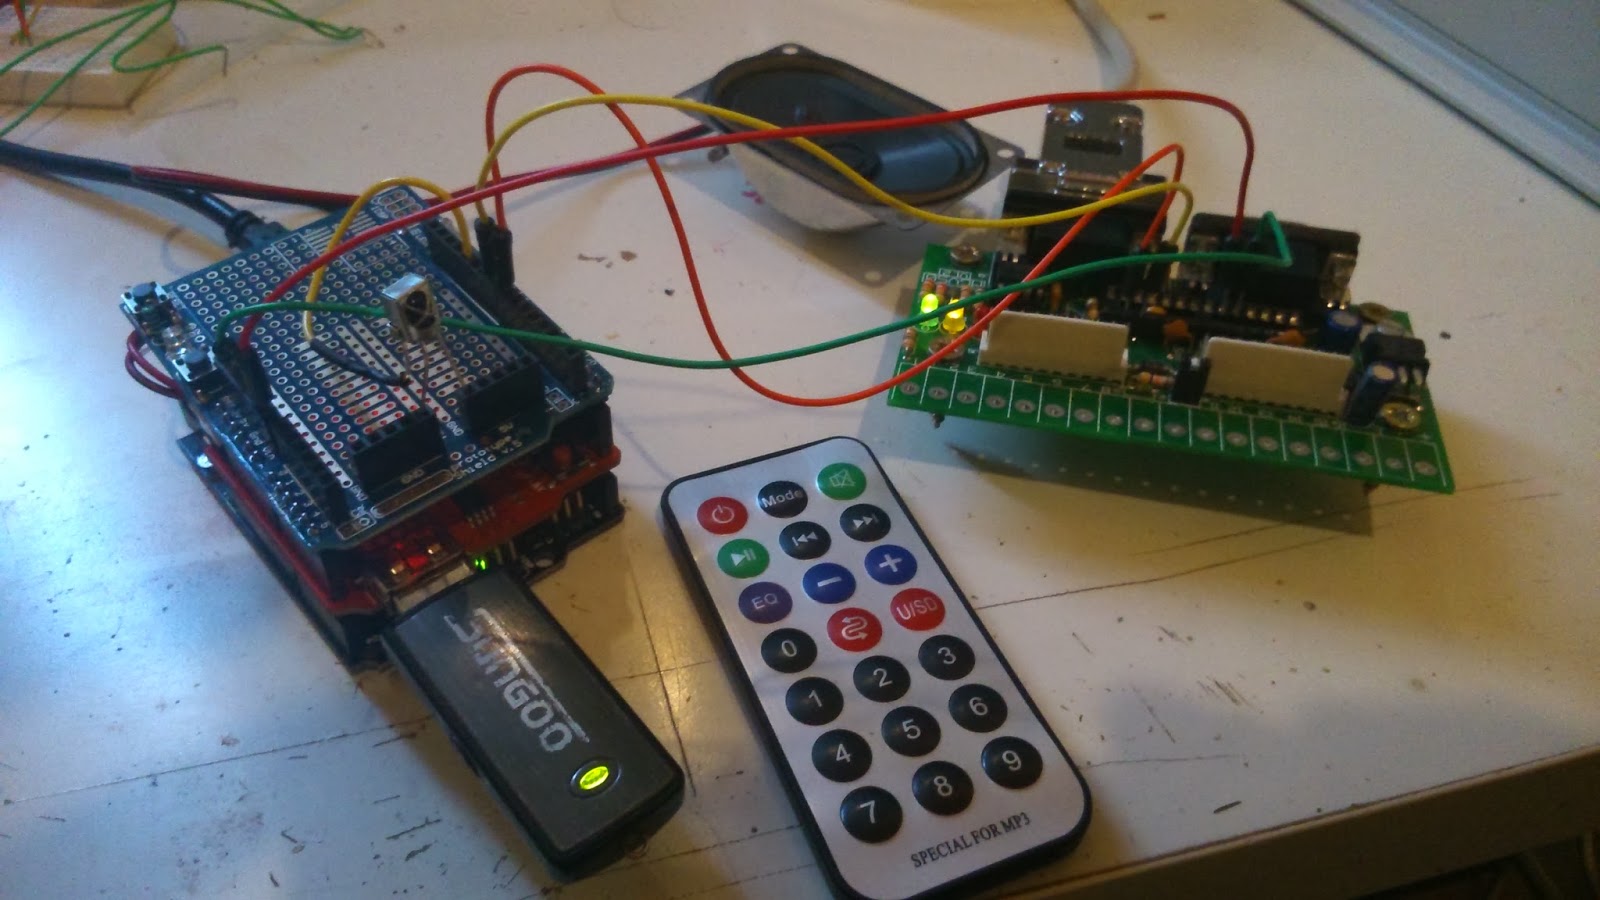
First of all, the list of materials:
How to upload a program to Arduino board:
IR Receiver connection:

First of all, the list of materials:
- Arduino UNO R3: About 15$ or less in ebay
- Elechouse MP3 shield with built in amplifier: 21.5$
- Remote controller and IR receiver: 6$
- pc speaker from an old PC (or new, did you ever used it???): 0$
- To make the Loconet interface, components are 5$ more or less, and you can mount it in a protoboard shield or use directly a GCA50 board from Giling Computer Aplications (5€). I'm working designing my own Loconet interface shield, but meanwhile Giling GCA50 does the job perfectly. Giling Boards
And now the pre-requisites:
- Download and install Arduino IDE software from here
- Take my source code from http://sourceforge.net/projects/hanasueki/files/. It's the .ino file. Store it in your PC, and open it from Arduino IDE
How to upload a program to Arduino board:
- Connect Arduino board with the USB wire to the PC
- Open the Arduino IDE and from there, open the source code downloaded from sourceforge (hanasuLNet_ino.ino)
- In Arduino IDE, select the serial port that has been installed (usually is the last one) in Tools -> Serial port
- Also select your arduino board (UNO) in Tools -> Board
- If you have the MP3 shield plugged: as the MP3 shield uses the same serial port as the PC connection, you have to put MP3 shield in sleep mode or the PC link will not work. There is a push button in MP3 shield named "Sleep", just push it 3 seconds.
- Now click the download button (round button with an arrow) in the IDE and wait the progress bar
- It's done!!!! If you have any problem, review Arduino help: http://arduino.cc/en/Guide/Windows
IR Receiver connection:
The IR receiver has three legs. One goes to the +5V pin, other to the GND pin, and the third one to the I/O number 11. Here you have a very good tutorial about IR: http://arduino-info.wikispaces.com/IR-RemoteControl
Now plug an USB or SD card to the MP3 shield and it's ready to work. Following the MP3 Shield instructions, you will see it's possible to copy files in the internal memory, so there's no real need of having a memory stick or SD card always connected.
The remote controller has various functions:
- MODE key selects the sound source (internal memory, memory stick or SD card)
- Volume controls
- Power button stores the current volume and mode values in the non volatile memory (it's like a "save config" button)
- With the number keys you can select a file number (in the order they were copied to the memory) and pressing the play button it will play the file.
- It's also possible to use the NEXT and PREVIOUS buttons to play directly the next or previous MP3 file
Here there is a video of the station announcer in action:
I'll continue in a new post for the Loconet part. Enjoy it!!!
Subscribe to:
Posts (Atom)