- 2-byte and 4-byte locomotive addressing
- 128-step speed throttling
- Activate/de-activate all accessory function addresses 0-2048
- Programming on the Main Operations Track
- write configuration variable bytes
- set/clear specific configuration variable bits
- Simultaneous control of multiple locomotives
- Control of all cab functions F0-F28
- Programming on the Programming Track
- write configuration variable bytes
- set/clear specific configuration variable bits
- read configuration variable bytes
But the best thing is that it will only cost you 8$ using the basic Arduino UNO, or 12$ using a more powerful Arduino MEGA. Yes, just 8$!!!! I suggest you to use Arduino MEGA in view of future expansions I want to implement, like a Loconet bus or the possibility to work in digital and analog mode. Don't be afraid about the difficulty to mount the system, you DON'T NEED to solder anything, just plug, upload the program, and run!!!
HARDWARE
To mount this command station you need the following hardware:
Arduino MEGA: It can be found in ebay for 8$, I bought it here. Arduino UNO is also suitable, but I prefer a MEGA board as it is faster and more expandable.
Arduino Motor Shield R3: It will not cost you more that 5$ in ebay, here is where I bought mine.
12 Vcc power supply: I use a power source from an old computer (yellow and black wires provide 12Vcc), but any power source with at least 2Amp can be used. For H0 scale, is better a 15Vcc power source, but for N scale 12Vcc is enough.
SOFTWARE
And the following is the needed software to make it run and manage and program trains:
Arduino IDE: This software is used to program Arduino or upload any already made software/firmware (or sketch in Arduino language) to the board. It will be used only once to upload the DCC++ command station sketch to the Arduino board, or in the future to upload a new program version with more features. It can be freely downloaded from Arduino official page: https://www.arduino.cc/en/Main/Software
Base Station DCC++: This is the software or firmware/sketch we will upload into Arduino board using the previous Arduino IDE. Just download and extract it in any folder in your computer. It can be downloaded from DCC++ page or directly clicking here.
JMRI: This is the program that "talks" to the command station and allows you to drive trains, move switches, program decoders, ... I plan to change the DCC++ command station protocol to make it more standard and be able to use also other software like Rocrail, but for now it must be used with JMRI. Download this software from http://jmri.sourceforge.net/download/index.shtml and install it. Under "Production Release" section of this page there are JMRI versions for Windows, Linux and Mac OS. This is a very good software, and freeware, and many times I use it to program decoders better than other software.
HOW TO MOUNT IT
Before mounting the Motor Shield r3 on top of Arduino, you have to cut the pad labeled "Vin" in the bottom of the board. This is to isolate the power input of the shield from the 12V power source that Arduino is also providing:Now you can plug the motor shield board on top of Arduino. There is only one position how the motor shield fits on top, and pins are numbered in both boards, so just make sure pin 0 of the motor shield is connected to pin 0 of Arduino board.
I you are using an Arduino UNO, you have to bridge pin 10 and 12 in the motor shield (blue wire in the following photo), and pins 5 and 13 (red wire):
In case of Arduino MEGA, only one bridge is needed between pin 2 and pin 13:
Connect your 12Vcc power source to the screw terminals of the motor shield. Positive is connected to the screw terminal "VIN", and ground to "GND".
In the same screw terminal block, "A+" and "A-" are connected to your main track, and "B+" and "B-" to the programming track.
Connect Arduino to the PC with a USB cable. Probably your Arduino already came with it. Your PC should recognize then a new serial port.
Now we will upload the firmware (or sketch in Arduino terms) to the board. Go to the folder where you extracted the Base Station DCC++. Inside the "DCCpp_Uno" folder double click the file named "DCCpp_Uno.ino".
This will automatically open the Arduino IDE. You have to set up your connected Arduino board under "Tools" menu, option "Board". And also select the serial port as your computer detected Arduino when connected. This is also under "Tools" menu, option "Port":
Now everything is ready to upload the program, and to archive that you only need to click the upload button on the top left corner. After some second you should receive a message saying "Program uploaded" if everything went ok:
HOW TO USE IT
To set up JMRI to work with your brand new command station, just follow these instructions: http://jmri.sourceforge.net/help/en/html/hardware/dccpp/index.shtml
And you are ready to test your system. First of all, go to "Power Control" option inside "Actions" menú. Click the power on button of the new opened window, and led on the motor shield should light on if everything is correct. Now you can open a throttle, put a locomotive on the track, select its address, and push the throttle up!!! There is also a very good utility in JMRI to monitor the power drained by the track:
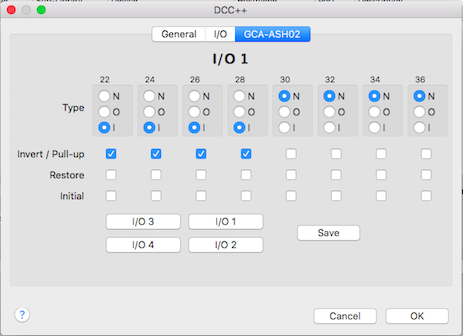
Now also Rocrail is compatible with this command station, and allows to use the other pins as input or outputs with the standard sketch from DCC++. You can use a connector to allow up to 4 GCA boards to be connected to the command station:
And you can configure pins as input or output as needed:
Even more, Rocrail has a special slot management with passive slot purge after 30 seconds idle and speed zero and it is compatible also with the Ethernet connection of DCC++ command station.
You can read all the information regarding the use of DCC++ command station with Rocrail here:
Enjoy it, now you have the best price/quality relation command station!!!!


