Showing posts with label LIghting. Show all posts

Monday, August 16, 2021

Kato 10-1644 E261 Saphir Odoriko DCC Conversion

This model is "DCC friendly" as written in the instruction manual, but you will find that head and tail cars have no under hatch to put the usual FL12 decoder (or I couldn't find it!). Instead, you have to open and disassemble the seats plastic piece:


I had to remove two cooper strips acting as springs to insert the decoder, and then put them again in place. Be patient, these springs are not easy to put again in place keeping the decoder and the long cooper strips in place. So it's a little bit tricky and seems not secure, but after putting the sits and closing everything everything works well so far.


About lighting, every car has its own light panel so will not need the plastic panels that comes with kato lighting kits:


Motor car is like any other DCC Friendly model:


It's nice that every car has a special light panel or diffuser, and the decoration of each car is also exquisite. The big windows allow to see perfectly and enjoy the interiors.


I hope you enjoyed it and that you find the way to install the cab and end car decoders easier than me!!


Wednesday, December 30, 2020

Philips HUE illumination system with Rocrail (2/2)

Before you continue reading, it is assumed that you have your Philips HUE Bridge installed and working with some lights, and it has a fixed IP Address that you know. Also, the bridge must connected to the same local network (same router or Wi-Fi) than the computer running Rocrail. If not, you can check the previous post here.

The first thing you have to do in your track plan is to open the Rocrail Properties under the File menu and add a new command station of type "HUE":


In hostname field put the IP address of your HUE bridge, and leave the User ID blank for the moment. This is explained also in the wiki of Rocrail: https://wiki.rocrail.net/doku.php?id=philips:hue-en

Next step is to create in the HUE bridge a user name to allow Rocrail to access to it and manage the lights, but for that Rocrail has implemented a special functionality. Go the the tab of decoder programming, write in the IID field the name of the newly created controller and press the PT button. This will get a new user from the HUE bridge and the User ID field of the image above will be automatically filled in. At the time of writing this post the instructions of Rocrail were not updated, so be careful if you try to follow the instructions from here.

There is also a very useful configuration screen for Philips HUE under the Programming menu. From there you can see the Bridge configuration and the lights linked with the address number that you will use for the weather configuration:

Next step is to create the light objects in rocrail, one for each physical light linked to the HUE Bridge. For each light you have to identify the interface (the name of the new controller you created) and the address that you checked in the screen corresponding to the image above. Define these output objects as type "lights". You can set in the "Value" field the desired intensity for this light:


And finally, you can setup the weather functionality. The complete description can be found on Rocrail wiki: https://wiki.rocrail.net/doku.php?id=weather-en

Basically, you have to select Weather under Tables menus and write the name of your recently created lights in the Outputs field (comma separated). I suggest you to use the "Colour table" and load one of the profiles already included in rocrail specially for HUE lights. Try to change some parameters to set the illumination you like, and test also the Theme tab where you can create storm effects if you have a white HUE lamp also linked to the bridge for lightning effects. I hope you enjoy it!!


Monday, December 28, 2020

Philips HUE illumination system with Rocrail (1/2)

Some time ago I published the following article explaining how to make an illumination system for the layout, compatible with the weather functionality of Rocrail:

http://www.clubncaldes.com/2016/01/layout-illumination-and-weather.html

But for those who don't want to use Arduino and make their own electronics, I'll show you how to use the Philips HUE system, much easier and professional, but a little bit more expensive. Anyway I'll show you also cheaper lamps to use than the original ones from Philips.

The first thing you will need is a Philips HUE bridge, this is what you will connect to your network (and to Rocrail) and manages all the lights you want to install:


HUE Bridge


You will need also some compatible RGB colour lights. There are kits including the bridge and some light bulbs, or a remote switch. Depending on the layout size, disposition, environment light or on the number of lights you want to install there are different options. Basically you have the following options:


GU10

GU10 lights: these are spot lights, so I do not recommend them or you will need to install a lot of them to cover all the layout with a light in an uniform way.


E27

E27 lights: these bulbs make a more diffuse light, but they should be installed not close to the layout. This is a very good option, but on a long layout you will need many of them and they are not cheap.


Led Strip

Led Strips: this is a cheaper option as you can illuminate a long section in an uniform way. In my case, my layout is composed of modules, so it's narrow but long. I would need many bulbs to illuminate it in a homogeneous way, on the other hand the led strips must be placed quite close to the layout. But I have a shelf at 50cm from the top of the modules all along the layout, so I just had to stick three 5 meters long led strips under the shelf instead of installing a dozen of light bulbs.


ZIGBEE compatible led strip

Any other ZIGBEE compatible lights
: Philips HUE lights are awesome by the intensity of the light and the colours, but they are also expensive. So you can use any ZIGBEE compatible light. Just make sure it is specified they are compatible with Philips HUE (check the icon under the image) and support the ZIGBEE protocol. I bought these led strips for my layout in Aliexpress, search for the following description: "Zigbee-minicontrolador RGBCW, 1-5M DC12V 5050 RGB + CCT 90leds/m, Kit de luces de tira LED para ZIGBEE 3,0 HUB hu-e Echo Plus APP"


So you will have to test and find the best (and cheapest) combination of lights for your layout, in my case I used 3 led strips (5 meters long each one) and one E27 light for a corner that missed more light.


Before starting the Rocrail configuration and the weather functionality setup, make sure your light are working with the mobile Philips HUE application in your smartphone. Follow the Philips instructions to pair the lights with the HUE bridge, it's really simple as you only have to press the button on the led strip and the bridge, or introduce the serial number of the bulb in the application.

Another important thing is to assign a fixed IP address to the bridge. This can be done using the smartphone HUE application as explained here: https://huetips.com/help/how-to-find-my-bridge-ip-address/


Once you have the lights working you have to setup Rocrail, but this will be explained in the following post.


Sunday, August 9, 2020

Battle of Hoth module

Another of my passions, apart from model railroading, is mounting and painting plastic kits. I especially like those old Star Wars plastic kits that were sold as merchandising at the same time that movies were released. I collect all MPC and AMT/ERTL kits sold during the eighties and nineties and when I feel I need a rest from trains, I use to take one of the pending boxes I have and I build the model.


I was in total lack of inspiration to decorate an end loop for my modular layout after I did the "Rice fields" and "Mine" modules, so I decided to make a break and mount the following kit about the Battle of Hoth:

When I opened the box I realized all figures were really small, they could match with our N scale train models. Searched in internet, and this is a 1:156 scale kit. So... why not to mount this diorama in my loop?

These are all the pieces in this kit, very easy to assemble as most of them are complete and you only need to cut them from the blister:


The most time consuming task was to paint each figure:


I was missing some important parts to be represented in the diorama, but thanks to thingiverse.com and the designs made by other people I 3D printed the following pieces:

Tunnel portal and Echo base entrance: designed by my own


Then I started building the "Echo base" as a kind of box, including illumination, RGB leds which allow me to make some nice special effects, and the Millenium Falcon, X-Wing and a couple of Snow Speeders:


And started planning the disposition of all elements:


Mountains reliefs were created using cardboard strips and hot glue, and all covered with plaster cloth. To make the rock walls you can put plaster and, while it is still soft, press with a crumpled aluminum fold:


I wanted this module to be interactive and very visual, so I installed red micro leds in the tip of the AT-AT Walker heads and a green one in the tip of the Ion Cannon:

I also tried for the first time to simulate explosions, fire and smoke following this guide: https://spikeybits.com/2014/10/hobby-how-to-make-explosions-smoke.html

Basically you need filling/stuffing material, normally used for stuffing for soft toys. Craft shops have this, but I bought a pillow in a poundshop which was filled of this material. To shape these fibers I made first a structure with chicken-wire. After painting it with black, yellow, orange and red paint insert a tea candle light. These tea candles are available in ebay and aliexpress and they are very cheap. The final result surprised me:

With everything in place, I covered the whole layout with Woodland Scenics Flex Paste together with Soft Flake Snow. You can check this video demonstrating the application of these products:


I installed an Arduino UNO and connected all lights plus a sound shield to it, and programmed everything to reproduce short scenes of the Battle of Hoth when a train passes or you move closer your hand to the front of the module like "using the force". Sorry because this video was recorded when the module was not finished yet:


Here you have some photos of the finished module:


Sunday, November 11, 2018

KATO 10-403 SL Banetsu Monogatari 場熱物語

Following my previous post, I want to install interior lighting to the Banetsu Monogatari cars that will run with the C57-180. The cab and end cars also have rear lights (only the red light), so I will install a decoder too.

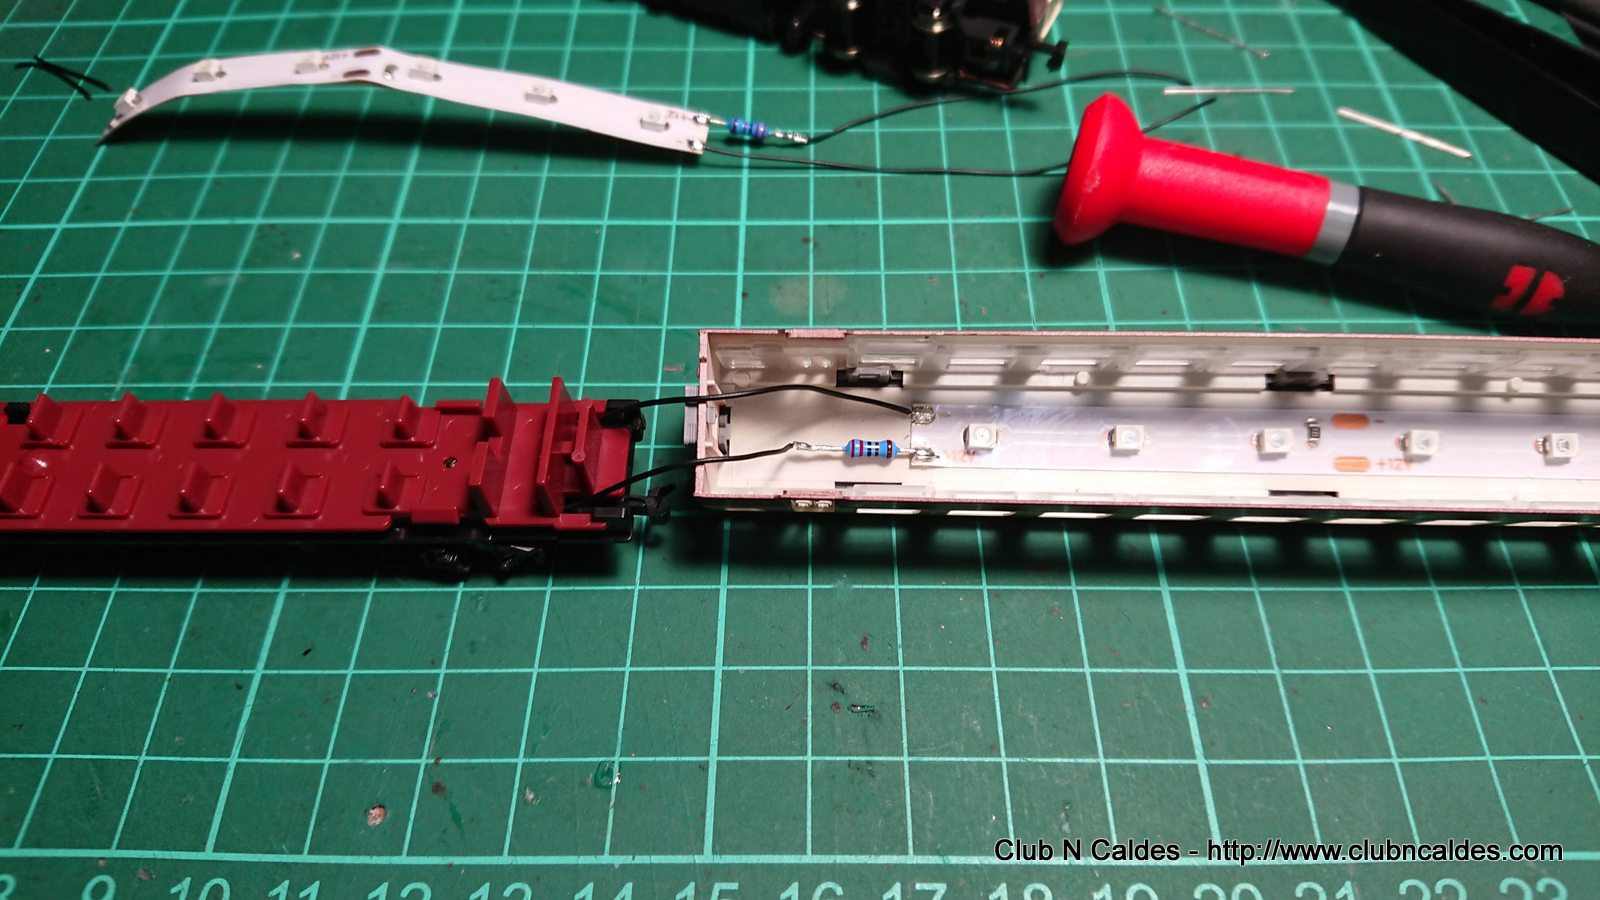
I tried Kato interior lighting kits, but they do not fit in this car. I guess only old models can be used, therefore I'll use led strips of warm white color with a 2.2kOhm resistor added to simulate an old light:


The strip is soldered directly to the current plates of the car:


Then stick the strip under the roof in the right position to close it as a clamp, keeping the wires as short as possible. I used black wires because in this way is really difficult to see them through the windows:


You can use the same procedure for all cars, including cab and end cars:


In order to save decoders, I disconnected red light from the front car and I will install a decoder only in the final car. To open it, better lift the rear part of the shell and pull from it to the front:


From the same light board I take the current for the decoder. The only modification needed is to cut and remove the diode. In this way one of the leads will be automatically isolated from the rail current, and there is were I'll solder the function wire:


Here the board with decoder already in place:


And work finished! I like the ambient of the light of these led strips, and it's so cheap that you can illuminate dozens of them with a few euros of investment. After some years I decided to do not install decoders for interior lighting. I realized I never turn the lights off, and it's a lot of money that you can use for more profitable things.